👨‍💻 Un Tech Lead fullstack pour accélérer votre projet ?
Je suis dispo pour des missions React / Node / Cloud.

Étiquette : architecture

  • Comment construire une stack multi-cloud souveraine sans exploser vos coûts ?

    🌩️ Le multi-cloud, un luxe ou nécessité ?

    Dans un monde où la souveraineté numérique, la résilience et la scalabilité sont devenues des enjeux stratégiques, de plus en plus d’entreprises se tournent vers une stratégie multi-cloud. Objectif : éviter la dépendance à un seul fournisseur (vendor lock-in), optimiser les performances et garantir la disponibilité des services critiques.
    Mais très vite, un piège se referme : l’explosion des coûts, la complexité d’orchestration, la duplication des ressources

    Comment faire dans ce cas ?

    🧱 Étape 1 — L’architecture modulaire : poser une fondation portable

    « Chaque équipe utilisait son cloud préféré. Rien n’était compatible. Le jour où on a voulu migrer un service de staging vers la prod, tout a cassé. »

    Beaucoup d’équipes commencent en mono-cloud, avec les outils maison du provider. Ça fonctionne… jusqu’au jour où on veut :

    • changer de cloud pour une question de coût ou souveraineté,
    • déployer dans un autre pays,
    • ou isoler des services sensibles.

    Si ton stack est verrouillé sur un provider, t’es piégé.

    💡 Solution : standardiser ton socle technique pour qu’il soit portable :

    • Conteneurisation (Docker, Podman) → packager tout de la même façon.
    • Orchestrateur commun (Kubernetes, Nomad) → une seule logique de déploiement.
    • Infrastructure as Code (Terraform, Pulumi) → tout est versionné, réutilisable.

    Résultat ? Tu peux répliquer un environnement complet sur un autre cloud en quelques heures. Sans tout réécrire.


    🧰 Étape 2 — Choisir ses clouds avec une logique de mission

    « Pourquoi notre frontend est sur Azure, le backend sur AWS et la base chez OVH ? — Personne ne savait. »

    Le multi-cloud n’a de sens que si chaque service est à sa place :

    • stockage froid sur un provider éco,
    • IA sur un cloud hyper spécialisé,
    • data sensible sur un hébergeur souverain ou auto-hébergé.

    C’est pas une question de techno. C’est une décision de bon sens, motivée par :

    • la sécurité,
    • les coûts,
    • la conformité.

    Et comme on dit toujours, pas tous les oeufs dans le même panier.


    💡 Étape 3 — Penser FinOps dès le début

    « On pensait que le staging coûtait 100€/mois. La facture : 480. Une base oubliée, deux volumes jamais supprimés, et des instances qui tournaient la nuit. »

    Dans le multi-cloud, les coûts s’éparpillent. Tu ne les vois pas venir.
    Penser FinOps, ce n’est pas juste installer un outil de suivi.
    C’est :

    • estimer les coûts avant chaque déploiement,
    • automatiser l’extinction des environnements non critiques,
    • éviter la duplication inutile (ex: pas 3 bases SQL pour 3 microservices).

    En intégrant ces réflexes tôt, tu évites les mauvaises surprises.
    Et surtout, tu gardes la main. Pas de factures en souffrance.


    🔐 Étape 4 — Sécurité : c’est toi le garant

    « Notre stockage objet était public. Par défaut. Et personne ne l’avait vu. »

    Chaque cloud a sa façon de gérer les accès, les secrets, les logs…
    Et ça rend le multi-cloud dangereux si tu ne centralises pas ta sécurité.

    Une stack multi-cloud doit avoir :

    • un point unique de gestion des secrets,
    • des identités gérées via un SSO ou OIDC,
    • une politique claire de journalisation et d’audit.

    Tu ne peux pas tout vérifier à la main. Tu dois t’outiller, documenter, automatiser.

    La souveraineté, ce n’est pas juste choisir un cloud français.
    C’est assumer la responsabilité de tes données, partout.


    📡 Étape 5 — Supervision et contrôle : savoir, pas espérer

    « Un jour, un cluster K3s est tombé. Personne n’a été alerté. Les logs n’étaient pas centralisés. On a passé 2h à chercher ce qui se passait. »

    Dans un système distribué, c’est ta visibilité qui fait ta résilience.
    S’il te manque un dashboard, un log, un backup, tu es aveugle. Et vulnérable.

    C’est pourquoi dès le départ, il faut :

    • superviser tous les clusters et clouds dans un seul outil (Grafana, Datadog, etc.),
    • agréger les logs et les erreurs dans un endroit unique,
    • automatiser les backups entre les clouds, et tester leur restauration.

    Pas besoin d’un gros budget. Juste d’une stratégie claire.
    Et d’une règle simple : aucune brique ne doit être orpheline.

    Envie d’un audit gratuit de votre stack actuelle ou de discuter stratégie multi-cloud ?

  • Implémentation d’une architecture hexagonale avec React et Redux

    Photo de Jonas Svidras sur Unsplash

    L’architecture hexagonale, également connue sous le nom de « Ports et Adaptateurs », est une approche de conception logicielle qui vise à créer des applications flexibles, maintenables et testables. Elle sépare clairement les préoccupations entre le domaine métier, l’infrastructure et l’interface utilisateur.

    Dans ce tutoriel, nous allons explorer comment structurer une application React avec Redux en utilisant une architecture hexagonale. Nous prendrons l’exemple d’une gestion d’utilisateurs pour illustrer les concepts, en suivant la structure de projet détaillée ci-dessous.

    Votre stack vous ralentit ?

    Je vous propose un audit technique gratuit pour identifier les freins à la performance ou à la maintenabilité.

    Structure du projet

    Voici la structure du projet que nous allons utiliser :

    app/                # Application : spécifique à React et Redux
      components/
      features/
        user/
          userSlice.ts
          userSelectors.ts
          userThunks.ts
          userHooks.ts
          pages/
            UserList.tsx
            UserDetail.tsx
            UserForm.tsx
      layout/
        FullPage.tsx
        Dashboard.tsx
      routes/
        userRoutes.ts
      store/
        index.ts
    domain/             # Métier : types et interfaces métiers
      entities/
        User.ts
      ports/
        UserRepository.ts
      services/
        UserService.ts
    infrastructure/     # Adapteurs : API, stockage, etc.
      api/
        userApi.ts
      storage/
        userStorage.ts
    styles/
    utils/
    

    Domaine (domain/)

    Le domaine contient la logique métier pure de votre application. Il est indépendant de l’interface utilisateur et de l’infrastructure.

    1. Entités (entities/)

    domain/entities/User.ts

    export interface User {
      id: string;
      name: string;
      email: string;
      role: string;
    }
    

    2. Ports (ports/)

    Les ports sont des interfaces qui définissent comment le domaine interagit avec l’extérieur.

    domain/ports/UserRepository.ts

    import { User } from '../entities/User';
    
    export interface UserRepository {
      getUsers(): Promise<User[]>;
      getUserById(id: string): Promise<User | null>;
      createUser(user: User): Promise<User>;
      updateUser(user: User): Promise<User>;
      deleteUser(id: string): Promise<void>;
    }
    

    3. Services (services/)

    Les services contiennent la logique métier et utilisent les ports pour accéder aux données.

    domain/services/UserService.ts

    import { User } from '../entities/User';
    import { UserRepository } from '../ports/UserRepository';
    
    export class UserService {
      constructor(private userRepository: UserRepository) {}
    
      async getAllUsers(): Promise<User[]> {
        // Logique métier supplémentaire si nécessaire
        return await this.userRepository.getUsers();
      }
    
      async getUserById(id: string): Promise<User | null> {
        // Logique métier supplémentaire si nécessaire
        return await this.userRepository.getUserById(id);
      }
    
      async createUser(user: User): Promise<User> {
        // Exemple de validation métier
        if (!user.email.includes('@')) {
          throw new Error('Email invalide');
        }
        return await this.userRepository.createUser(user);
      }
    
      async updateUser(user: User): Promise<User> {
        // Logique métier pour la mise à jour
        return await this.userRepository.updateUser(user);
      }
    
      async deleteUser(id: string): Promise<void> {
        // Logique métier pour la suppression
        return await this.userRepository.deleteUser(id);
      }
    }
    

    Infrastructure (infrastructure/)

    L’infrastructure contient les implémentations concrètes des ports définis dans le domaine.

    1. API (api/)

    infrastructure/api/userApi.ts

    import axios from 'axios';
    import { User } from '../../domain/entities/User';
    import { UserRepository } from '../../domain/ports/UserRepository';
    
    export class UserApi implements UserRepository {
      private apiUrl = '/api/users';
    
      async getUsers(): Promise<User[]> {
        const response = await axios.get<User[]>(this.apiUrl);
        return response.data;
      }
    
      async getUserById(id: string): Promise<User | null> {
        const response = await axios.get<User>(`${this.apiUrl}/${id}`);
        return response.data;
      }
    
      async createUser(user: User): Promise<User> {
        const response = await axios.post<User>(this.apiUrl, user);
        return response.data;
      }
    
      async updateUser(user: User): Promise<User> {
        const response = await axios.put<User>(`${this.apiUrl}/${user.id}`, user);
        return response.data;
      }
    
      async deleteUser(id: string): Promise<void> {
        await axios.delete(`${this.apiUrl}/${id}`);
      }
    }


    2. Stockage (storage/)

    Optionnellement, vous pouvez implémenter un stockage local.

    infrastructure/storage/userStorage.ts

    import { User } from '../../domain/entities/User';
    import { UserRepository } from '../../domain/ports/UserRepository';
    
    export class UserStorage implements UserRepository {
      private storageKey = 'users';
    
      async getUsers(): Promise<User[]> {
        const data = localStorage.getItem(this.storageKey);
        return data ? JSON.parse(data) : [];
      }
    
      async getUserById(id: string): Promise<User | null> {
        const users = await this.getUsers();
        return users.find(user => user.id === id) || null;
      }
    
      async createUser(user: User): Promise<User> {
        const users = await this.getUsers();
        users.push(user);
        localStorage.setItem(this.storageKey, JSON.stringify(users));
        return user;
      }
    
      async updateUser(user: User): Promise<User> {
        let users = await this.getUsers();
        users = users.map(u => (u.id === user.id ? user : u));
        localStorage.setItem(this.storageKey, JSON.stringify(users));
        return user;
      }
    
      async deleteUser(id: string): Promise<void> {
        let users = await this.getUsers();
        users = users.filter(u => u.id !== id);
        localStorage.setItem(this.storageKey, JSON.stringify(users));
      }
    }
    

    Application (app/)

    L’application gère l’interface utilisateur avec React et la gestion d’état avec Redux.

    1. Store Redux (store/)

    app/store/index.ts

    import { configureStore } from '@reduxjs/toolkit';
    import userReducer from '../features/user/userSlice';
    
    export const store = configureStore({
      reducer: {
        user: userReducer,
        // Autres reducers...
      },
    });
    
    export type RootState = ReturnType<typeof store.getState>;
    export type AppDispatch = typeof store.dispatch;
    

    app/store/hooks.ts

    import { TypedUseSelectorHook, useDispatch, useSelector } from 'react-redux';
    import type { RootState, AppDispatch } from './index';
    
    // Utilisez ces hooks personnalisés dans votre application
    export const useAppDispatch = () => useDispatch<AppDispatch>();
    export const useAppSelector: TypedUseSelectorHook<RootState> = useSelector;
    

    2. Features (features/)

    Nous allons maintenant détailler la partie features/user/.

    a. Slice utilisateur (userSlice.ts)

    app/features/user/userSlice.ts

    import { createSlice } from '@reduxjs/toolkit';
    import { User } from '../../domain/entities/User';
    import { fetchUsers, fetchUserById, createUser, updateUser, deleteUser } from './userThunks';
    
    interface UserState {
      users: User[];
      selectedUser: User | null;
      loading: boolean;
      error: string | null;
    }
    
    const initialState: UserState = {
      users: [],
      selectedUser: null,
      loading: false,
      error: null,
    };
    
    const userSlice = createSlice({
      name: 'user',
      initialState,
      reducers: {
        clearSelectedUser(state) {
          state.selectedUser = null;
        },
      },
      extraReducers: builder => {
        builder
          // fetchUsers
          .addCase(fetchUsers.pending, state => {
            state.loading = true;
            state.error = null;
          })
          .addCase(fetchUsers.fulfilled, (state, action) => {
            state.loading = false;
            state.users = action.payload;
          })
          .addCase(fetchUsers.rejected, (state, action) => {
            state.loading = false;
            state.error = action.error.message || 'Erreur lors du chargement des utilisateurs';
          })
          // fetchUserById
          .addCase(fetchUserById.pending, state => {
            state.loading = true;
            state.error = null;
          })
          .addCase(fetchUserById.fulfilled, (state, action) => {
            state.loading = false;
            state.selectedUser = action.payload;
          })
          .addCase(fetchUserById.rejected, (state, action) => {
            state.loading = false;
            state.error = action.error.message || "Erreur lors du chargement de l'utilisateur";
          })
          // createUser
          .addCase(createUser.fulfilled, (state, action) => {
            state.users.push(action.payload);
          })
          // updateUser
          .addCase(updateUser.fulfilled, (state, action) => {
            const index = state.users.findIndex(u => u.id === action.payload.id);
            if (index !== -1) {
              state.users[index] = action.payload;
            }
          })
          // deleteUser
          .addCase(deleteUser.fulfilled, (state, action) => {
            state.users = state.users.filter(u => u.id !== action.payload);
          });
      },
    });
    
    export const { clearSelectedUser } = userSlice.actions;
    export default userSlice.reducer;
    

    b. Thunks (userThunks.ts)

    Modification importante : Les thunks utilisent maintenant les services du domaine au lieu d’accéder directement à l’API.

    app/features/user/userThunks.ts

    import { createAsyncThunk } from '@reduxjs/toolkit';
    import { User } from '../../domain/entities/User';
    import { UserService } from '../../domain/services/UserService';
    import { UserApi } from '../../infrastructure/api/userApi';
    
    // Instanciez le service avec l'implémentation du repository
    const userRepository = new UserApi();
    const userService = new UserService(userRepository);
    
    export const fetchUsers = createAsyncThunk('user/fetchUsers', async () => {
      return await userService.getAllUsers();
    });
    
    export const fetchUserById = createAsyncThunk('user/fetchUserById', async (id: string) => {
      return await userService.getUserById(id);
    });
    
    export const createUser = createAsyncThunk('user/createUser', async (user: User) => {
      return await userService.createUser(user);
    });
    
    export const updateUser = createAsyncThunk('user/updateUser', async (user: User) => {
      return await userService.updateUser(user);
    });
    
    export const deleteUser = createAsyncThunk('user/deleteUser', async (id: string) => {
      await userService.deleteUser(id);
      return id;
    });
    

    c. Sélecteurs (userSelectors.ts)

    Les sélecteurs permettent d’accéder facilement aux données du store.

    app/features/user/userSelectors.ts

    import { RootState } from '../../store';
    
    export const selectUsers = (state: RootState) => state.user.users;
    export const selectSelectedUser = (state: RootState) => state.user.selectedUser;
    export const selectUserLoading = (state: RootState) => state.user.loading;
    export const selectUserError = (state: RootState) => state.user.error;
    

    d. Hooks (userHooks.ts)

    Les hooks personnalisés facilitent la réutilisation de la logique dans les composants.

    app/features/user/userHooks.ts

    import { useAppDispatch, useAppSelector } from '../../store/hooks';
    import { useEffect } from 'react';
    import {
      fetchUsers,
      fetchUserById,
      createUser,
      updateUser,
      deleteUser,
    } from './userThunks';
    import {
      selectUsers,
      selectSelectedUser,
      selectUserLoading,
      selectUserError,
    } from './userSelectors';
    
    export const useUsers = () => {
      const dispatch = useAppDispatch();
      const users = useAppSelector(selectUsers);
      const loading = useAppSelector(selectUserLoading);
      const error = useAppSelector(selectUserError);
    
      useEffect(() => {
        dispatch(fetchUsers());
      }, [dispatch]);
    
      return { users, loading, error };
    };
    
    export const useUser = (id: string) => {
      const dispatch = useAppDispatch();
      const user = useAppSelector(selectSelectedUser);
      const loading = useAppSelector(selectUserLoading);
      const error = useAppSelector(selectUserError);
    
      useEffect(() => {
        dispatch(fetchUserById(id));
      }, [dispatch, id]);
    
      return { user, loading, error };
    };
    
    export const useCreateUser = () => {
      const dispatch = useAppDispatch();
      return (user: User) => dispatch(createUser(user));
    };
    
    export const useUpdateUser = () => {
      const dispatch = useAppDispatch();
      return (user: User) => dispatch(updateUser(user));
    };
    
    export const useDeleteUser = () => {
      const dispatch = useAppDispatch();
      return (id: string) => dispatch(deleteUser(id));
    };
    

    e. Pages (pages/)

    UserList.tsx

    app/features/user/pages/UserList.tsx

    import React from 'react';
    import { useUsers, useDeleteUser } from '../userHooks';
    import { Link } from 'react-router-dom';
    
    const UserList: React.FC = () => {
      const { users, loading, error } = useUsers();
      const deleteUser = useDeleteUser();
    
      if (loading) return <p>Chargement...</p>;
      if (error) return <p>Erreur : {error}</p>;
    
      return (
        <div>
          <h1>Liste des utilisateurs</h1>
          <Link to="/users/new">Créer un nouvel utilisateur</Link>
          <ul>
            {users.map(user => (
              <li key={user.id}>
                <Link to={`/users/${user.id}`}>{user.name}</Link> ({user.email}) - {user.role}
                <button onClick={() => deleteUser(user.id)}>Supprimer</button>
              </li>
            ))}
          </ul>
        </div>
      );
    };
    
    export default UserList;
    
    UserDetail.tsx

    app/features/user/pages/UserDetail.tsx

    import React from 'react';
    import { useParams, Link } from 'react-router-dom';
    import { useUser } from '../userHooks';
    
    const UserDetail: React.FC = () => {
      const { id } = useParams<{ id: string }>();
      const { user, loading, error } = useUser(id!);
    
      if (loading) return <p>Chargement...</p>;
      if (error) return <p>Erreur : {error}</p>;
      if (!user) return <p>Utilisateur non trouvé</p>;
    
      return (
        <div>
          <h1>Détails de l'utilisateur</h1>
          <p>Nom : {user.name}</p>
          <p>Email : {user.email}</p>
          <p>Rôle : {user.role}</p>
          <Link to={`/users/${user.id}/edit`}>Modifier</Link>
        </div>
      );
    };
    
    export default UserDetail;
    
    UserForm.tsx

    app/features/user/pages/UserForm.tsx

    import React, { useEffect } from 'react';
    import { useForm } from 'react-hook-form';
    import { User } from '../../../domain/entities/User';
    import { useCreateUser, useUpdateUser, useUser } from '../userHooks';
    import { useNavigate, useParams } from 'react-router-dom';
    
    const UserForm: React.FC = () => {
      const { id } = useParams<{ id: string }>();
      const isEditMode = Boolean(id);
      const { register, handleSubmit, reset } = useForm<User>();
      const createUser = useCreateUser();
      const updateUser = useUpdateUser();
      const navigate = useNavigate();
      const { user } = useUser(id!);
    
      useEffect(() => {
        if (isEditMode && user) {
          reset(user);
        }
      }, [isEditMode, user, reset]);
    
      const onSubmit = async (data: User) => {
        if (isEditMode) {
          await updateUser({ ...data, id: id! });
        } else {
          await createUser(data);
        }
        navigate('/users');
      };
    
      return (
        <div>
          <h1>{isEditMode ? 'Modifier' : 'Créer'} un utilisateur</h1>
          <form onSubmit={handleSubmit(onSubmit)}>
            <div>
              <label>Nom</label>
              <input {...register('name', { required: true })} />
            </div>
            <div>
              <label>Email</label>
              <input {...register('email', { required: true })} />
            </div>
            <div>
              <label>Rôle</label>
              <input {...register('role', { required: true })} />
            </div>
            <button type="submit">{isEditMode ? 'Mettre à jour' : 'Créer'}</button>
          </form>
        </div>
      );
    };
    
    export default UserForm;
    

    3. Routes (routes/)

    app/routes/userRoutes.ts

    import React from 'react';
    import { Route, Routes } from 'react-router-dom';
    import UserList from '../features/user/pages/UserList';
    import UserDetail from '../features/user/pages/UserDetail';
    import UserForm from '../features/user/pages/UserForm';
    
    const UserRoutes: React.FC = () => (
      <Routes>
        <Route path="/users" element={<UserList />} />
        <Route path="/users/new" element={<UserForm />} />
        <Route path="/users/:id/edit" element={<UserForm />} />
        <Route path="/users/:id" element={<UserDetail />} />
      </Routes>
    );
    
    export default UserRoutes;
    

    4. Layout (layout/)

    app/layout/FullPage.tsx

    import React from 'react';
    
    const FullPageLayout: React.FC = ({ children }) => {
      return (
        <div className="full-page-layout">
          {children}
        </div>
      );
    };
    
    export default FullPageLayout;
    

    app/layout/Dashboard.tsx

    import React from 'react';
    import { Link, Outlet } from 'react-router-dom';
    
    const DashboardLayout: React.FC = () => {
      return (
        <div className="dashboard-layout">
          <nav>
            <ul>
              <li><Link to="/users">Utilisateurs</Link></li>
              {/* Autres liens de navigation */}
            </ul>
          </nav>
          <main>
            <Outlet />
          </main>
        </div>
      );
    };
    
    export default DashboardLayout;
    

    5. Point d’entrée principal

    app/App.tsx

    import React from 'react';
    import { BrowserRouter as Router, Routes, Route } from 'react-router-dom';
    import DashboardLayout from './layout/Dashboard';
    import FullPageLayout from './layout/FullPage';
    import UserRoutes from './routes/userRoutes';
    
    const App: React.FC = () => {
      return (
        <Router>
          <Routes>
            <Route path="/" element={<DashboardLayout />}>
              {/* Routes principales */}
              <Route path="users/*" element={<UserRoutes />} />
            </Route>
            {/* Routes avec un autre layout */}
            <Route path="/login" element={<FullPageLayout>{/* Composant de connexion */}</FullPageLayout>} />
          </Routes>
        </Router>
      );
    };
    
    export default App;
    

    Styles (styles/)

    Le dossier styles/ contient vos fichiers CSS ou SCSS pour styliser votre application.

    Utils (utils/)

    Le dossier utils/ contient des fonctions utilitaires réutilisables dans votre application.

    Conclusion

    En adoptant une architecture hexagonale dans votre application React avec Redux, vous bénéficiez d’une séparation claire des responsabilités :

    • Domaine : Contient la logique métier pure et est indépendant des frameworks et bibliothèques.
    • Infrastructure : Gère les détails techniques comme les appels API et le stockage.
    • Application : Gère l’interface utilisateur et l’état de l’application.

    En modifiant les thunks pour qu’ils utilisent les services du domaine plutôt que d’accéder directement à l’infrastructure, vous respectez pleinement les principes de l’architecture hexagonale. Cela permet de garder votre couche d’application indépendante des détails techniques de l’infrastructure.

    Cette architecture facilite la maintenance, les tests et l’évolutivité de votre application.

    Ressources supplémentaires

    Vous pouvez consulter ma proposition d’archi hexagonal en Golang

  • Implementing Hexagonal Architecture in Go: A Practical Guide

    In the ever-evolving landscape of software development, maintaining modularity and testability is paramount. One architectural pattern that stands out for achieving these goals is the Hexagonal Architecture, also known as the Ports and Adapters pattern. In this blog post, we’ll explore how to implement this architecture in Go (Golang) through a practical example: a simple User management system.

    The Hexagonal Architecture promotes a clear separation of concerns, ensuring that the core business logic remains independent of external systems such as databases, APIs, or user interfaces. This separation not only enhances maintainability but also facilitates testing and adaptability.

    Let’s dive into the concepts, structure, and implementation details of this architecture in our Go project.

    You can find all the project code sources here https://github.com/techerjeansebastienpro/go-hexa-example

    Understanding Hexagonal Architecture

    What is Hexagonal Architecture?

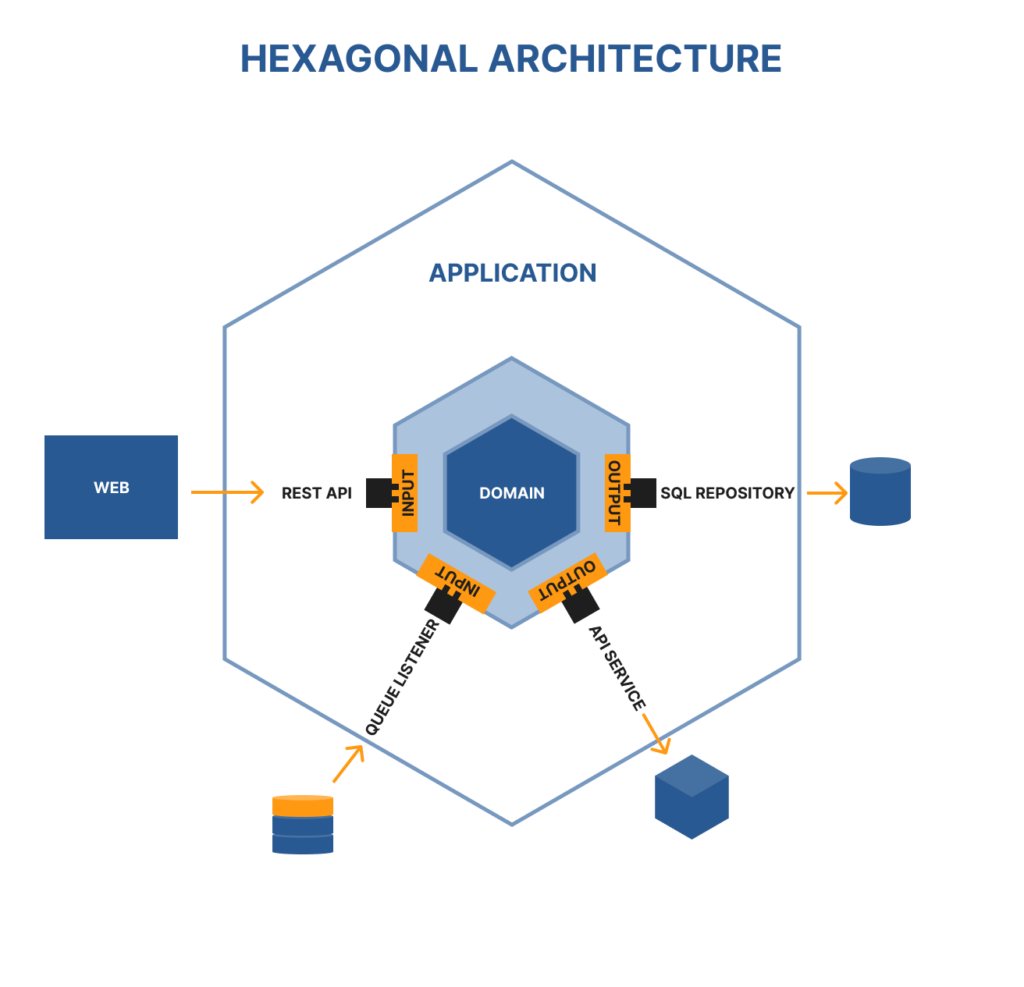
    Hexagonal Architecture, also known as the Ports and Adapters pattern, is an architectural style that aims to create loosely coupled application components that can be easily connected and disconnected. This architecture promotes a separation of concerns by isolating the core business logic from external systems such as databases, user interfaces, and third-party services. The core idea is to have a central « hexagon » or core, surrounded by various « adapters » that handle the communication with external entities through well-defined « ports. »

    In Hexagonal Architecture, the core consists of the application’s domain logic, including entities and use cases. The ports define the interfaces through which the core interacts with the outside world. Adapters are the implementations of these interfaces, providing the necessary code to connect the core to external systems. This structure allows the core to remain independent of the technical details of external systems, making the application more modular, maintainable, and testable.

      Benefits and Principles

      Benefits:

      1. Modularity: Hexagonal Architecture encourages the development of self-contained modules that are easier to manage and understand. Each module has a clear responsibility and can be developed and tested in isolation.
      2. Testability: By isolating the core business logic from external dependencies, Hexagonal Architecture makes it easier to write unit tests. Mocking external systems becomes straightforward, allowing for comprehensive testing of the core logic without requiring the actual systems.
      3. Flexibility and Maintainability: The clear separation between the core and external systems makes it simpler to replace or upgrade components. For instance, switching from one database to another or changing the user interface framework can be done with minimal impact on the core business logic.
      4. Independence from Frameworks: Hexagonal Architecture reduces the reliance on specific frameworks or technologies. The core logic remains pure and free from framework-specific code, making it easier to adapt to new frameworks or technological advancements.
      5. Enhanced Collaboration: This architecture facilitates better collaboration between different teams, such as front-end and back-end developers. Since the core logic is separated from the interfaces, different teams can work on their respective parts without interfering with each other.

      Principles:

      1. Separation of Concerns: Divide the application into distinct sections with clear responsibilities. The core should handle the business logic, while adapters should manage the technical details of interacting with external systems.
      2. Dependency Inversion: Depend on abstractions (ports) rather than concrete implementations. This principle ensures that the core logic does not directly depend on external systems, but rather on interfaces that can be implemented by any external system.
      3. Explicit Interfaces: Define clear and explicit interfaces (ports) for communication between the core and external systems. This approach makes the interactions well-defined and predictable.
      4. Independence from External Systems: Ensure that the core logic is not tightly coupled with any external system. The core should be self-sufficient and able to function without relying on specific external technologies or frameworks.
      5. Adaptability: Design the system in a way that makes it easy to replace or modify components without affecting the core logic. Adapters should be plug-and-play, allowing for seamless integration with different external systems.

      Project Structure

      Overview of the directory and file organization

      cmd/
        api/
          api.go
      internal/
        application/
          user_dto.go
          user_http_handler.go
        domain/
          user_entities.go
          user_ports.go
          user_service.go
        infrastructure/
          user_repository.go
          user_api.go
      pkg/
        models/
      

      Justification for the chosen structure

      Hexagonal Architecture principles don’t impose structure or models. We should apply them according to language limits and paradigms.

      This implementation is my interpretation of these principles according to my own experience with this language.

      I’m open for advice – do not hesitate to comment this blog post.

      Domain Layer Implementation

      Defining entities (User)

      internal/domain/user_entities.go

      On the business side, we manipulate entities. These objects represent the logic of the business.

        package domain
        
        type User struct {
        	ID    string
        	Email string
        }
        
        type FindOneById struct {
        	ID string
        }
        
        type FindOneByEmail struct {
        	Email string
        }
        
        type FindOneRequest struct {
        	FindOneById
        	FindOneByEmail
        }
        
        type CreateUser struct {
        	Email    string
        	Password string
        }


        Creating domain services and interfaces (ports)

        internal/domain/user_ports.go

        Here, we define the interfaces of our application. That’s what are the resources we can retrieve or actions we can do.

        package domain
        
        type UsersInput interface {
        	GetByID(ID string) (User, error)
        	CreateOne(request CreateUser) (User, error)
        }
        
        type UsersOuput interface {
        	FindOneById(request FindOneById) (User, error)
        	FindOneByEmail(request FindOneByEmail) (User, error)
        	InsertOne(request CreateUser) (User, error)
        }


        internal/domain/user_service.go

        This part aims to group all the business logic. If we have to add control checking or business rules …, we can add them here. It does not depend on any kind of technology and environment.

        package domain
        
        import (
        	"errors"
        )
        
        type UserService struct {
        	output UsersOuput
        }
        
        func NewUserService(out UsersOuput) *UserService {
        	return &UserService{output: out}
        }
        
        func (s *UserService) FindOne(request FindOneRequest) (User, error) {
        	if request.ID != "" {
        		return s.output.FindOneById(FindOneById{ID: request.ID})
        	}
        	if request.Email != "" {
        		return s.output.FindOneByEmail(FindOneByEmail{Email: request.Email})
        	}
        	return User{}, errors.New("invalid request")
        }
        
        func (s *UserService) Insert(request CreateUser) (User, error) {
        	return s.output.InsertOne(request)
        }


        Infrastructure: Implementing Interfaces

        Repository to access data sources

        internal/infrastructure/user_repository.go

        The repository is an implementation of the Output port UserOutput. As the domain service uses an output via dependency inversion, that implementation can be updated without affecting the business logic. In some cases, automated testing, for example, we can use a mocked repository.

        package infrastructure
        
        import (
        	"context"
        
        	"github.com/techerjeansebastienpro/go-hexa-example/internal/domain"
        	db "github.com/techerjeansebastienpro/go-hexa-example/pkg/models"
        )
        
        type UserRepository struct {
        	prisma *db.PrismaClient
        }
        
        func NewUserRepository(prisma *db.PrismaClient) *UserRepository {
        	return &UserRepository{
        		prisma: prisma,
        	}
        }
        
        func (r *UserRepository) FindOneById(request domain.FindOneById) (domain.User, error) {
        	ctx := context.Background()
        	foundUser, err := r.prisma.User.FindUnique(
        		db.User.ID.Equals(request.ID),
        	).Exec(ctx)
        
        	return domain.User{
        		ID: foundUser.ID,
        	}, err
        }
        
        func (r *UserRepository) FindOneByEmail(request domain.FindOneByEmail) (domain.User, error) {
        	ctx := context.Background()
        	foundUser, err := r.prisma.User.FindUnique(
        		db.User.Email.Equals(request.Email),
        	).Exec(ctx)
        
        	return domain.User{
        		ID: foundUser.ID,
        	}, err
        }
        
        func (r *UserRepository) InsertOne(request domain.CreateUser) (domain.User, error) {
        	ctx := context.Background()
        	createdUser, err := r.prisma.User.CreateOne(
        		db.User.Email.Set(request.Email),
        		db.User.Password.Set(request.Password),
        	).Exec(ctx)
        
        	return domain.User{
        		ID:    createdUser.ID,
        		Email: createdUser.Email,
        	}, err
        }


        API to expose your service

        internal/infrastructure/user_api.go

        The UserApi implements an input, UserInput, and uses the domain service. This part of the code does not depend on the environment and can be used by multiple « adapters » such as REST API / GraphQL API / gRPC … . We can mock the API in case of automated tests on those adapters.

        package infrastructure
        
        import (
        	"github.com/techerjeansebastienpro/go-hexa-example/internal/domain"
        )
        
        type UserApi struct {
        	userService domain.UserService
        }
        
        func NewUserApi(userService domain.UserService) *UserApi {
        	return &UserApi{
        		userService: userService,
        	}
        }
        
        func (a *UserApi) GetByID(ID string) (domain.User, error) {
        
        	return a.userService.FindOne(domain.FindOneRequest{
        		FindOneById: domain.FindOneById{
        			ID: ID,
        		},
        	})
        }
        
        func (a *UserApi) CreateOne(request domain.CreateUser) (domain.User, error) {
        	return a.userService.Insert(domain.CreateUser{
        		Email:    request.Email,
        		Password: request.Password,
        	})
        }


        Application: configure your application

        Create the first HTTP Handler

        package application
        
        import (
        	"github.com/gin-gonic/gin"
        	"github.com/techerjeansebastienpro/go-hexa-example/internal/domain"
        )
        
        type UserHttpHandler struct {
        	userInput domain.UsersInput
        	app       *gin.Engine
        }
        
        func NewUserHttpHandler(app *gin.Engine, userInput domain.UsersInput) *UserHttpHandler {
        	return &UserHttpHandler{
        		userInput: userInput,
        		app:       app,
        	}
        }
        
        func (u *UserHttpHandler) RegisterRoutes() {
        	u.app.GET("/users/:id", u.GetByID)
        	u.app.POST("/users", u.Create)
        }
        
        func (u *UserHttpHandler) GetByID(c *gin.Context) {
        	id := c.Param("id")
        	user, err := u.userInput.GetByID(id)
        	if err != nil {
        		c.JSON(500, gin.H{"error": err.Error()})
        		return
        	}
        
        	c.JSON(200, user)
        }
        
        func (u *UserHttpHandler) Create(c *gin.Context) {
        	var createUser domain.CreateUser
        	if err := c.ShouldBindJSON(&createUser); err != nil {
        		c.JSON(400, gin.H{"error": err.Error()})
        		return
        	}
        
        	user, err := u.userInput.CreateOne(createUser)
        	if err != nil {
        		c.JSON(500, gin.H{"error": err.Error()})
        		return
        	}
        
        	c.JSON(201, &UserDTO{
        		ID:    user.ID,
        		Email: user.Email,
        	})
        }
        
        
        package application
        
        type UserDTO struct {
        	ID    string `json:"id"`
        	Email string `json:"email"`
        }


        Complete Example

        Putting it all together in api.go

        cmd/api/api.go

        The program needs an entry point to bootstrap services and core systems. We instantiate all the services we need to run a specific HTTP service to handle external requests.

        package main
        
        import (
        	"fmt"
        
        	"github.com/gin-gonic/gin"
        	"github.com/spf13/viper"
        	"github.com/techerjeansebastienpro/go-hexa-example/internal/application"
        	"github.com/techerjeansebastienpro/go-hexa-example/internal/domain"
        	"github.com/techerjeansebastienpro/go-hexa-example/internal/infrastructure"
        	db "github.com/techerjeansebastienpro/go-hexa-example/pkg/models"
        )
        
        func main() {
        	envConfig()
        	fmt.Println(viper.GetString("DATABASE_URL"))
        	prismaClient := db.NewClient(
        		db.WithDatasourceURL(viper.GetString("DATABASE_URL")),
        	)
        	if err := prismaClient.Prisma.Connect(); err != nil {
        		panic(err)
        	}
        
        	defer func() {
        		if err := prismaClient.Prisma.Disconnect(); err != nil {
        			panic(err)
        		}
        	}()
        	userService := domain.NewUserService(infrastructure.NewUserRepository((prismaClient)))
        	api := infrastructure.NewUserApi(*userService)
        
        	app := gin.New()
        	application.NewUserHttpHandler(app, api).RegisterRoutes()
        
        	app.Run(":8080")
        
        }
        
        func envConfig() {
        	viper.SetConfigFile(".env")
        	viper.ReadInConfig()
        }


        Explanation of the overall flow

        This article provides an implementation overview, illustrating how the Hexagonal Architecture principles are applied in our Go project. Hexagonal Architecture is based on the principles of modularity, separation of concerns, and independence from external systems, ensuring that the core business logic remains isolated from technical details. While Go is a powerful and efficient language for implementing these principles, it does have some limitations, particularly in its support for generics. The limited generics in Go can restrict the ability to encapsulate certain functionalities, which might be more seamlessly achieved in languages with more advanced generic capabilities, such as Java or C#. Nonetheless, Go’s simplicity and strong typing make it a suitable choice for many applications, providing a clear and maintainable structure that adheres to the core concepts of Hexagonal Architecture.

        Conclusion

        In this blog post, we explored the implementation of Hexagonal Architecture in a Go project through a user management system. We started by understanding the core principles and benefits of this architectural pattern. Then, we delved into the detailed structure of our project, from defining the domain layer to implementing adapters and configuring the infrastructure. By maintaining a clear separation of concerns, Hexagonal Architecture not only enhances the modularity and testability of applications but also makes them more adaptable to changes. Whether you’re working on a small project or a complex system, this architecture can provide a robust foundation. We encourage you to experiment with this architecture in your projects and experience the benefits firsthand. Feel free to share your thoughts and questions in the comments below – we’d love to hear from you! Happy coding!